
쿼카러버의 기술 블로그
[Session Management (3/3)] Javascript로 구현하고 이해하는 Session Management 본문
[Session Management (3/3)] Javascript로 구현하고 이해하는 Session Management
quokkalover 2022. 1. 23. 23:04Session Mangement는 크게 3가지 페이지로 구성된다.
1) 쿠키란 무엇인가
2) 세션이란 무엇인가
3) Javascript로 구현하고 이해하는 Session Management
본 글은 마지막 장인 Javascript로 구현하고 이해하는 Session Management 에 대해 다룬다.
학습방법 :
이번 페이지만 읽어도 간단한 예시와 함께 Session Management에 대해 이해할 수 있겠지만, 좀 더 깊은 이해를 원한다면 앞의 시리즈 페이지를 매우 짧게 작성했으니 한번쯤은 읽어보는 것을 추천한다.
본 글의 흐름은 다음과 같다.
1) 세션 관리가 필요한 이유 : login logout 기능
2) 쿠키가 필요한 이유
3) 쿠키를 식별자로 사용한 예시 및 단점 설명 (Javascript 예시)
4) 쿠키 대신 세션을 사용하는 법 (Javascript 예시)
세션 관리가 왜 필요한가? : Login, LogOut기능
login, logout과 같은 인증(Authentication) 기능은 웹 개발자에게 있어서 가장 어려운 feature중 하나다.
하지만 보안과 안정성을 확보하기 위해서는 꼭 필요한 feature다.
login, logout기능이 매우 필요한 이유는 client의 요청(request)이 누구의 요청인지, 특정하기가 매우 어렵기 때문이다. IP, browser와 같은 부수적인 정보가 있긴 하지만 많은 사람들이 같은 IP를 공유하고 있는 등의 이유로 특정하기가 어렵다.
따라서, 서버에게 요청을 날릴 때, 내가 누구인지 알리기 위해 Cookie와 Session 인증이 많이 사용된다.
Cookie가 필요한 이유
흔히들 우리가 웹사이트를 이용할 때, 로그인 후에 서버에서 바로 로그아웃이 되지 않는 경우는 웹사이트에서 cookie와 session기능을 지원하고 있다고 예상할 수 있다.
클라이언트는 서버에게 자신에 대한 정보와 자신의 authentication status를 쿠키를 통해 보내게 된다.
가장 간단한 쿠키의 예시를 들어보면 아래와 같이 = 을 통해 **key-value 페어** 형태로 사용된다.
name=richet웹 브라우저는 쿠키를 내부적으로 저장해두고 있다가, 클라이언트가 서버에 요청을 보낼 때 쿠키를 request 헤더에 붙여서 보내게 된다. 이 과정을 sequence diagram으로 표현하면 아래와 같다.
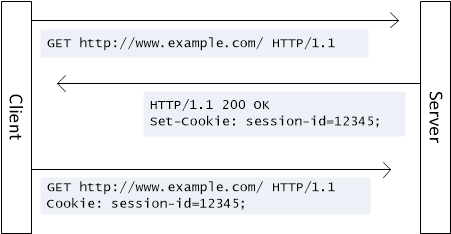
위에서 보여지듯이, 쿠키는 클라이언트의 정보를 keep tracking하기 위해 사용된다.
쿠키에는 나에 대한 정보가 담겨있기 때문에, 보안적인 이유로 주기적으로 쿠키를 삭제하는 것을 권장하기도 한다.
아래 코드는 자바스크립트 코드로, 쿠키를 받으면 쿠키를 console에 출력하고, response에 쿠키를 붙여서 보내는 예제다.
코드 실행을 위한 설정은 아래 레포를 참고하길 바란다. (스타 눌러주면 감사)
https://github.com/getveryrichet/javascript_study/tree/main/session_management/simple_cookie
GitHub - getveryrichet/javascript_study
Contribute to getveryrichet/javascript_study development by creating an account on GitHub.
github.com
const http = require('http');

// parseCookies parses `name=gplee;year=1993` and convert this to
// { name : 'gplee', year: '1993' }
const parseCookies = (cookie = '') =>
    cookie
        .split(';')
        .map(v => v.split('='))
        .map(([k, ...vs]) => [k, vs.join('=')])
        .reduce((acc, [k, v]) => {
            acc[k.trim()] = decodeURIComponent(v);
            return acc;
        }, {});

http.createServer((req, res) => {
    const cookies = parseCookies(ㅣ는
코드를 실행하고 localhost:8082에 크롬의 Network 콘솔에 접속해보면 터미널에 아래와 같은 정보가 출력된다.
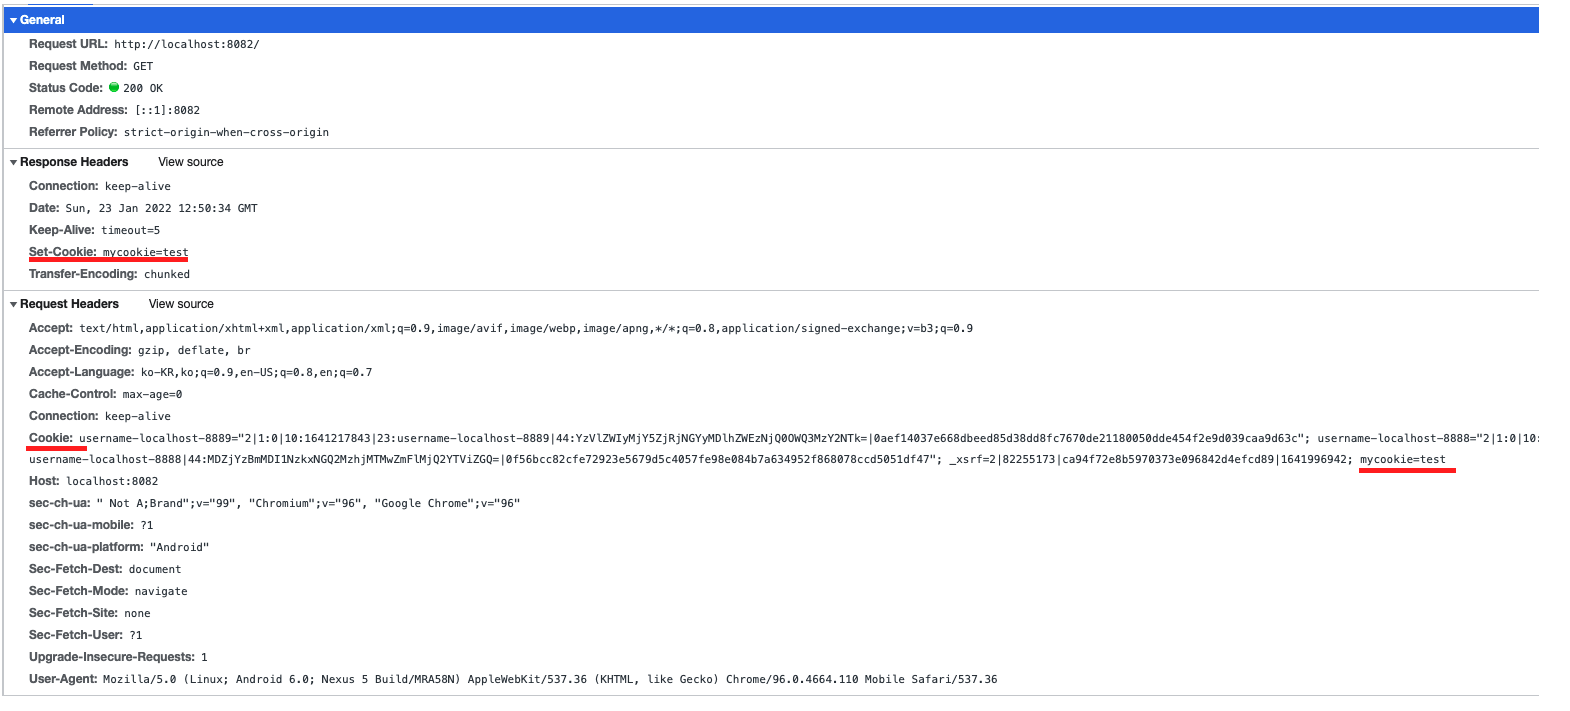
위에 가만히 보면 mycookie: ‘test’가 있는걸을 볼 수 있다.
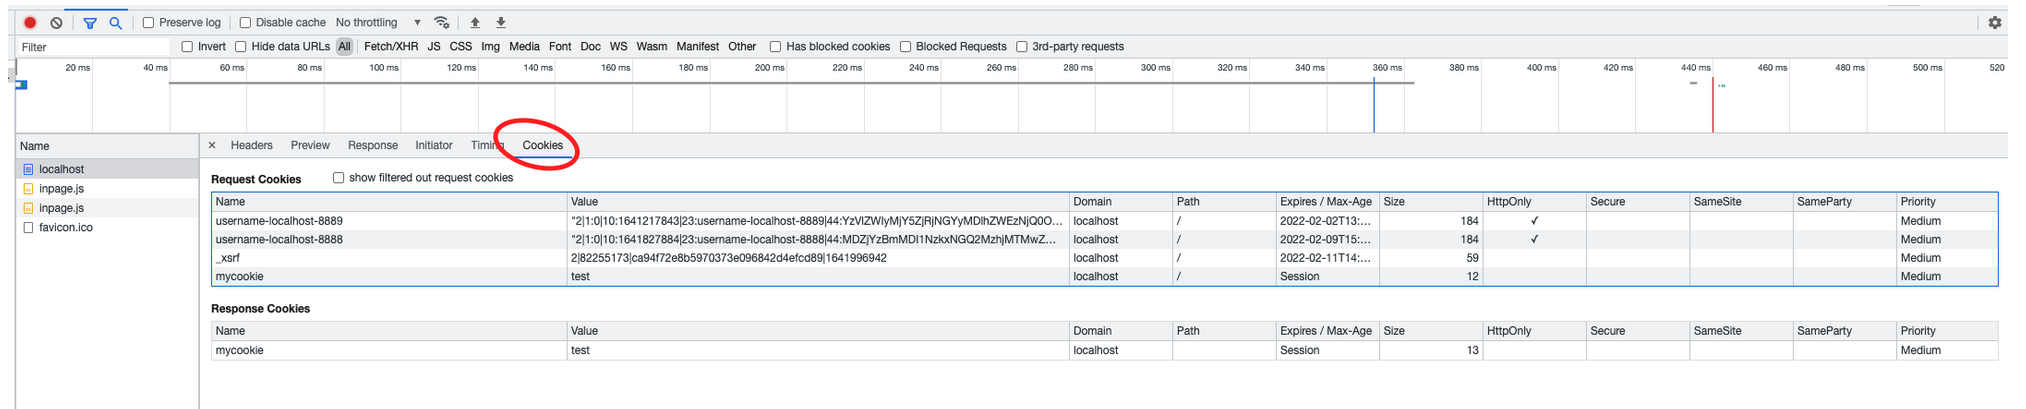
쿠키탭에 들어가도, 어떤 쿠키들이 있는지 볼 수 있다.
쿠키가 client의 식별자로 사용할 때
위에서는 쿠키만으로는 client가 누구인지 특정할 수 없었다. 이제는 본격적으로 쿠키를 사용해 client가 누구인지 한번 특정해보자
코드 실행을 위한 설정은 아래 레포를 참고하길 바란다. (스타 눌러주면 감사)
javascript_study/session_management/cookie_for_identifier at main · getveryrichet/javascript_study
GitHub - getveryrichet/javascript_study
Contribute to getveryrichet/javascript_study development by creating an account on GitHub.
github.com
<!DOCTYPE html>
<html lang="en">
<head>
    <meta charset="UTF-8">
    <title>Understand Cookie and Session</title>
</head>
<body>
    <form action="/login">
        <input id="name" name="name" placeholder="Write your name">
        <button id="login">Login</button>
    </form>
</body>
</html>
위는 browser에 띄울 html코드
// Code available from https://github.com/gpDA/cookieSession
const http = require('http');
const fs = require('fs');
const url = require('url');
const qs = require('querystring');
const parseCookies = (cookie = '') =>
cookie
.split(';')
.map(v => v.split('='))
.map(([k, ...vs]) => [k, vs.join('=')])
.reduce((acc, [k, v]) => {
acc[k.trim()] = decodeURIComponent(v);
return acc;
}, {});
http.createServer((req, res) => {
const cookies = parseCookies(req.headers.cookie);
if(req.url.startsWith('/login')) {
// analyze url
const { query } = url.parse(req.url);
// analyze query0string
const { name } = qs.parse(query);
const expires = new Date();
// set cookies expires in 1 minute
expires.setMinutes(expires.getMinutes() + 1);
res.writeHead(302, {
Location: '/',
'Set-Cookie': `name=${encodeURIComponent(name)};Expires=${expires.toGMTString()};HttpOnly; Path=/`,
});
res.end();
} else if (cookies.name) {
res.writeHead(200, { 'Content-Type': 'text/html; charset=utf-8'});
res.end(`Welcome ${cookies.name}`)
} else {
fs.readFile('./index.html', (err,data) => {
if (err) {
throw err;
}
res.end(data);
});
}
})
.listen(8083, () => {
console.log('listening on port 8083');
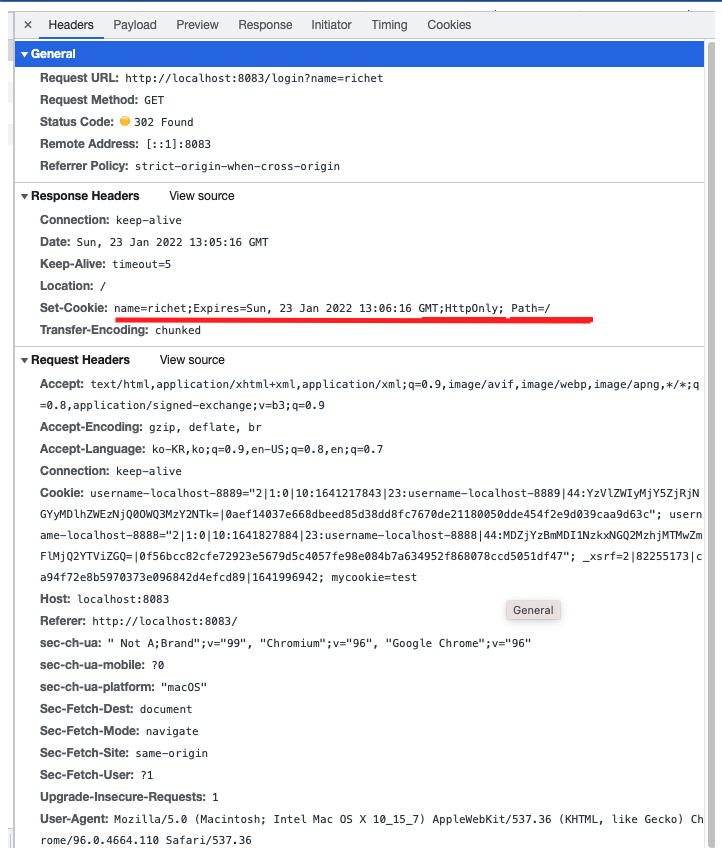
})위는 자바스크립트로 쓰여진 서버 코드다.
위 코드에서 주목할 부분은 Expires, HttpOnly,그리고 Path옵션이 사용됐다는 점이다.
또한 쿠키는 semicolon ;를 사용해 구분하여 여러개의 내용을 담을 수 있다. 자주 사용되는 cookie들은 아래와 같다.
Expires=date: Expiration Date for cookie ; Default expiration date is until expiration of client (web browser)Max-age=seconds: Similar to Expires but in seconds ; Have a priority overExpiresDomain=DomainName: We can specify domain which the cookie is sent ; Default is the current domainPath=URL: We can specify URL ; Default URL is'/'and can send to every URL by defaultSecure: available to send cookie only for HTTPSHttpOnly: block access from JavaScript to cookie ; It prevents cookie manipulation
위처럼 쿠키를 사용할 수 있지만, 쿠키 사용의 가장 큰 단점 중 하나는 바로 보안에 취약하다는 점이다. 쿠키가 서버가 아닌 Browser에 저장되기 때문이다. 유저의 개인정보를 브라우저에 담게되면 외부에 노출되기가 매우 쉽기 때문이다.
따라서 Session을 사용할 수 있다.
Cookie대신 Session사용하기
다음은 쿠키 대신 Session을 사용하는 예제다.
GitHub - getveryrichet/javascript_study
Contribute to getveryrichet/javascript_study development by creating an account on GitHub.
github.com
// Code available from https://github.com/gpDA/cookieSession
const http = require('http');
const fs = require('fs');
const url = require('url');
const qs = require('querystring');

const parseCookies = (cookie = '') =>
    cookie
        .split(';')
        .map(v => v.split('='))
        .map(([k, ...vs]) => [k, vs.join('=')])
        .reduce((acc, [k, v]) => {
            acc[k.trim()] = decodeURIComponent(v);
            return acc;
        }, {});

const session = {};

http.createServer((req, res) => {
    const cookies = parseCookies(req.headers.cookie);
    if(req.url.startsWith('/login')) {
        const { query } = url.parse(req.url);
        const { name } = qs.parse(query);
        const expires = new Date();
        expires.setMinutes(expires.getMinutes() + 1);
        const randomInt = +new Date();
        session[randomInt] = {
            name,
            expires
        };
        res.writeHead(302, {
            // instead of sending user name along with cookie, send randomInt and set name and expired time in session object
            Location: '/',
            'Set-Cookie': `session=${randomInt};Expires=${expires.toUTCString()};HttpOnly;Path=/`,
        });
        res.end();
    } else if (cookies.session && session[cookies.session].expires > new Date()) {
        res.writeHead(200, { 'Content-Type': 'text/html; charset=utf-8'});
        res.end(`Welcome ${session[cookies.session].name}`)
    } else {
        fs.readFile('./server4.html', (err,data) => {
            if (err) {
                throw err;
            }
            res.end(data);
        });
    }
})
    .listen(8084, () => {
        console.log('listening on port 8084');
    })
위 코드는 그 전과 거의 다를게 없는데 하나의 차이는
cookie에 유저의 이름을 쓰는게 아니라, session object에 유저에 대한 정보를 담고, 유저에게는 session_id로 randomInt를 리턴한다는 점이다.
만약 expiration date를 초과하지 않는다면 cookie.session을 통해서 유저에 대한 정보를 얻을 수 있다.
원래는 세션을 object에 담아두고 하진 않지만 위는 테스트코드이기 때문에 그렇게 구현됐다는 점 참고하길 바란다.
참고자료
https://medium.com/@felin.arch/session-management-4d7642343e21
https://velog.io/@whwodgns/JS-Session이란
https://velog.io/@neity16/NodeJS-인증쿠키-세션-토큰
'웹 개발' 카테고리의 다른 글
| [JWT] JWT란 무엇인가? (JSON Web Token) 쉽게 정리한 core개념들 (1) | 2022.02.18 |
|---|---|
| [웹 개발] Origin(출처)란 무엇인가? (What is Origin?) (0) | 2022.01.24 |
| [웹 개발] CORS란 무엇인가? (what is Cross Origin Request Sharing?) (CORS 한번에 뿌시기) (nginx CORS에러) (0) | 2022.01.24 |
| [Session Mangement (2/3)] 세션이란 무엇인가? (What is Session?) (0) | 2022.01.23 |
| [Session Management (1/3)] 쿠키란 무엇인가? (What is Cookie?) (0) | 2022.01.23 |


